Tuesday, September 3, 2013

Late Summer Tomato Basil Soup

So it's not officially fall yet, but school is in session, weather is starting to grey a bit here in Vancouver and so I am declaring that yes....soup season has arrived. Time to bring out the slow cooker, test out recipes and bring on the steaming bowls of soup on a cold day. There is nothing better, if you ask me. I try to cook in season whenever I can and so I am often inspired by whatever is fresh, yummy and let's be honest....whatever is on sale at the farmers market, Whole Foods or wherever I happen to be shopping. For the last few weeks pints of assorted cherry tomatoes have been on special at Whole Foods, so I wanted to try my hand at tomato soup. I couldn't find a recipe that combined the required ingredients that in my mind would make up the perfect tomato soup (basil, roasted garlic and cream). So I freestyled it and made one up. It was pretty easy and my family loved it....which makes for a successful recipe in my books!  For those of you not ready to let go of summer yet.... we'll call this recipe Late Summer Creamy Roasted Tomato and garlic soup with fresh basil. That's a mouthful! Now go make this delicious soup and enjoy a mouthful of what I hope will be a new fave soup for you and your family. 

Late Summer Creamy Roasted Tomato and Garlic soup with fresh basil

Ingredients:
1 can Earth's Choice organic tomatoes (crushed in puree with basil)
1 pint of cherry tomatoes (assorted red, yellow and orange)
2 heads of garlic 
2 cups of vegetable stock
I handful of fresh basil
250 ml heavy cream

Prep the garlic and cherry tomatoes first....both can be roasted at 425 degrees. The garlic will take about 45 minutes in a small container, drizzled in olive oil and covered in tin foil. The tomatoes will take much less time (about 15 minutes) so put them in around the 30 minute mark of your roasting garlic. I found it easiest to roast them on a baking sheet covered in parchment. I basically watched them and called it done when they popped open! When the garlic is done you can basically just squeeze it into the soup like a paste. 


  • Combine all the ingredients EXCEPT the cream in a large pot and simmer on low/medium for 30 minutes. 
  • Cool
  • Blend/puree in a regular blender or using immersion blender if you have one
  • Return to pot and stir in the cream
  • Simmer on low for 10-15 or until hot enough to eat
  • Add salt and pepper to taste
  • Enjoy!
♥ Lindsay


Thursday, May 16, 2013

Hair and there: DIY headbands galore!

Since my baby girl was blessed with such a fabulous head of hair, I have been challenged to find cute ways to keep it under control and out of her pretty face! At only 10 months old, I have already cut her hair 3 times. Her bangs grow so dang fast, I have cut those twice (before realizing that if I keep cutting them, she will have bangs and I am not sure I want that yet)....and now we are pinning them. As for her mullet-turned-rattail; I recently gave up hope that it would ever find a way to blend in with the rest of her hair and finally trimmed that too. 
I was kind of sad to cut her precious baby hair, but I mean....really....it had to go!


But even with the absence of her unfortunate rat tail, I am afraid her need for hair management has only just begun. She has her Daddy's cowlick and I have been noticing lately that her hair is getting more of my signature 'wave' (aka....frizzy mess that I can't control without product and a lot of time and effort) when it's wet. 
A little gift from your parents to you. You're welcome. So all I can say is....T.G.F.P.
Thank Goodness for Pinterest. Have I mentioned how much I love Pinterest. You really can find anything on there....including what seems like an endless number of DIY tutorials for adorable headbands and hair pieces for little girls. And as long as Pinterest is around, I am sure Alexis will be able to find new and fabulous ways to embrace whatever hair challenges she's been dealt. Until then.....I get to make her pretty things to put in her hair. 
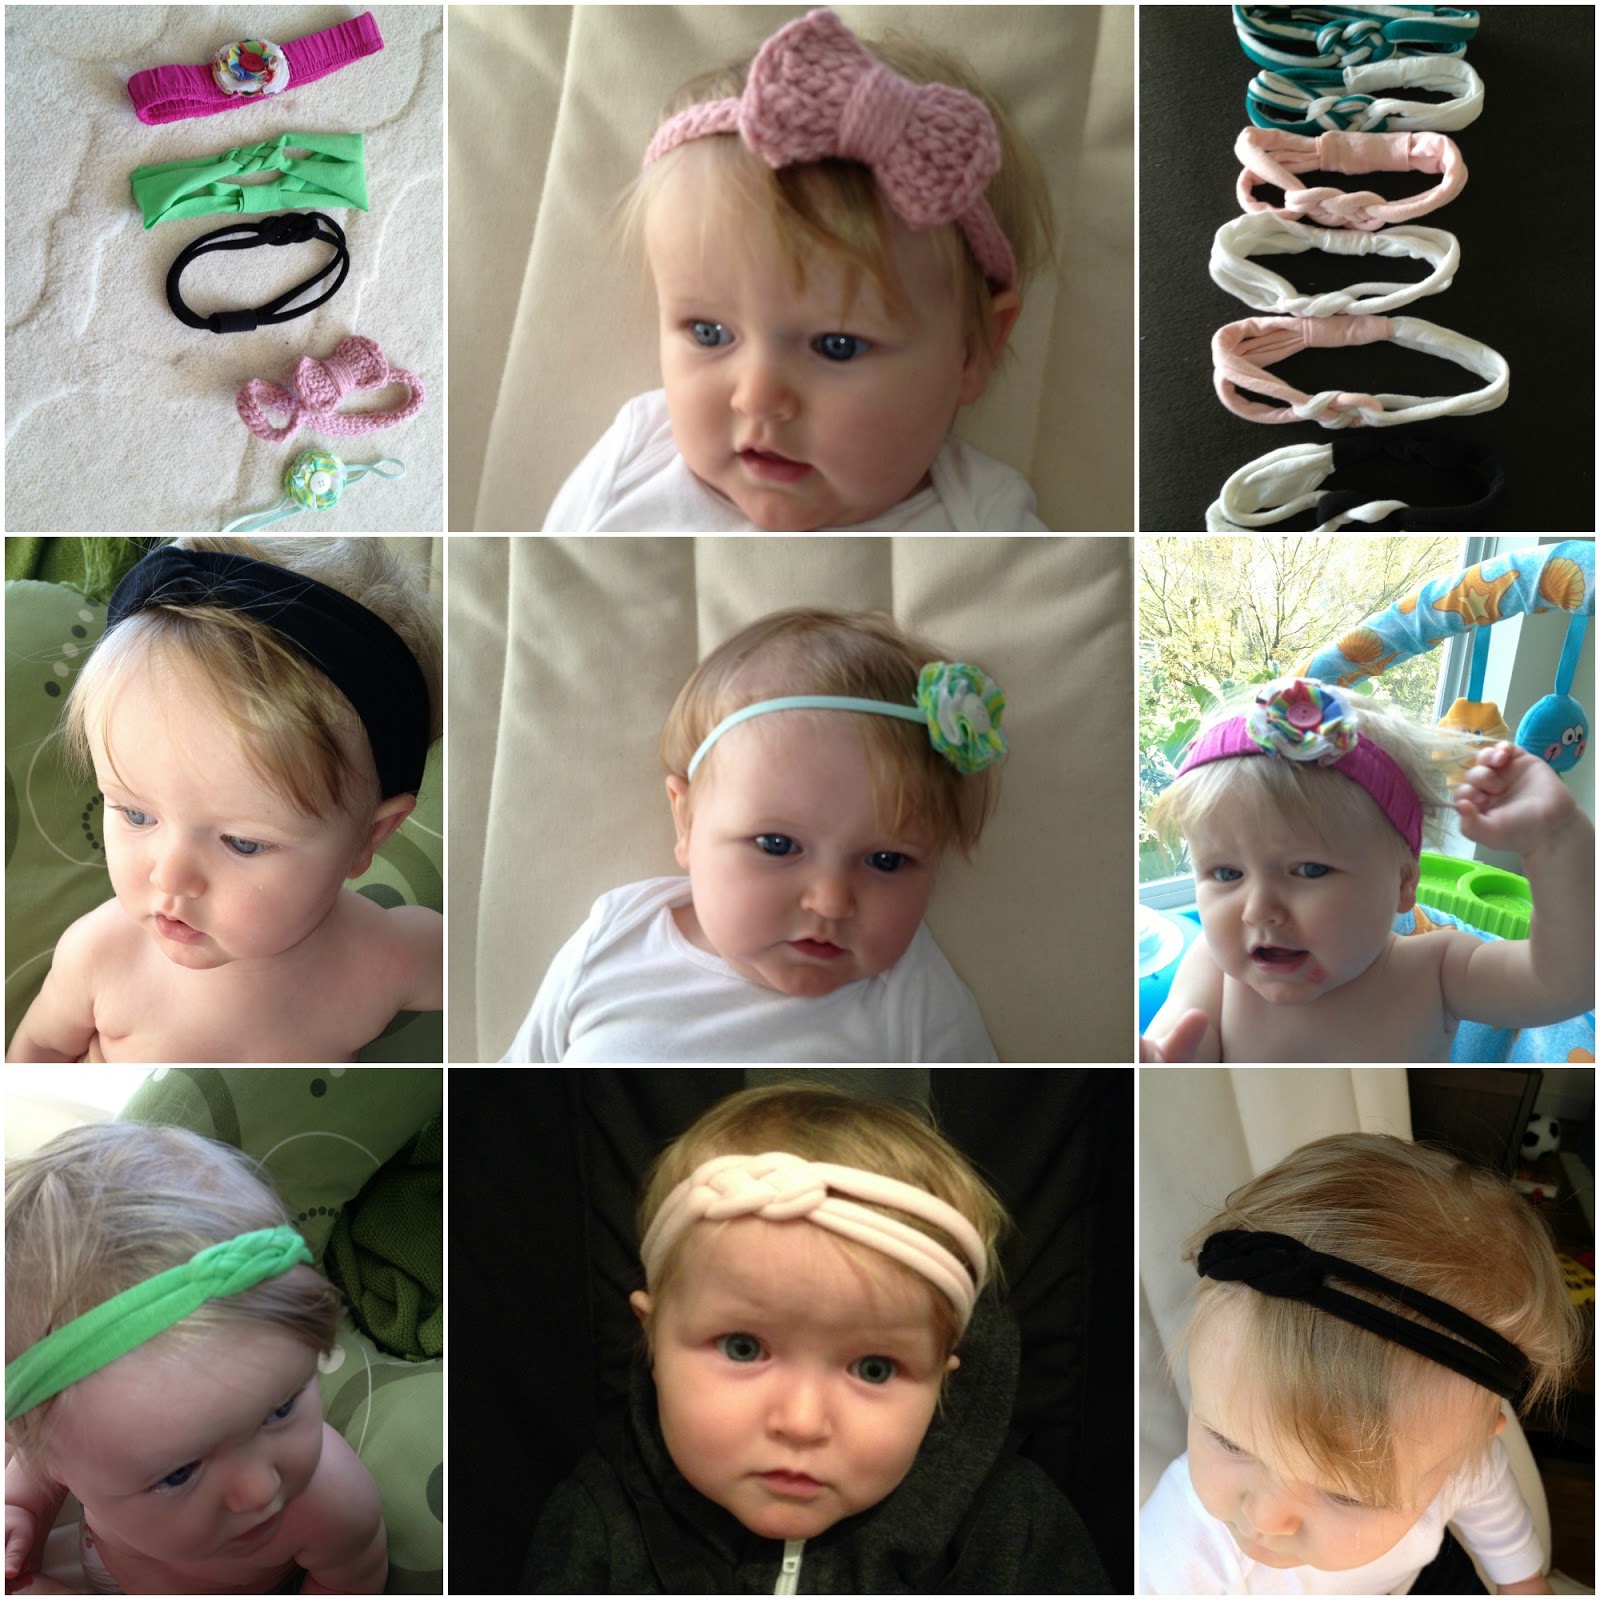
Here are a few of them on my sometimes patient and sometimes reluctant model. 
Overboard? Maybe. 
Cute? Definitely
The pink crocheted headband in photo #2 is my own design and it's super simple. See below for instructions. 
Here are the links to the tutorials for the black turban style headband the braided headband (in lower 3 photos). These literally take 3 minutes each, so it's easy to see why I made 1 in every colour and colour combination with the material I had sitting around. 

As for the two styles of floral headbands, check out my lovely friend Jill's blog for a fabulous tutorial that you can follow and make in any fabric combination you can think of! Thick or thin band in lace, jersey, tulle and more....each one gives the headband a different feel. The best part is that you probably have all the materials you need for this one lying around your house.....especially if you make use of this genius idea from Alisa Burke's blog. Look closely at the pink floral head band in photo #6 above. It's the waistband of an old pair of Alexis' pants that she grew out of! Turns out that the elastic waistband of your baby's pants just happens to be the same size of your baby's head!! 
Coincidence? I think not.  

As you can see the possibilities are endless when it comes to accessorizing your baby girl.....and I find it hard to stop myself.....so I probably won't. Up next; hair clips, barrettes and pony tail holders. Oh my!
♥ Lindsay 

Instructions for the crocheted bow headband: 
*disclaimer....I am by no means a professional pattern writer so hopefully this makes sense*
1. Using size 7 or 4.5mm hook chain until you can wrap it around the head of the desired wearer. This will be the band part. Remember it does have a bit of stretch to it so make sure it's not too loose to start out. Mine was about 60 chains for my 10 month old. 
2. single crochet in each chain across (60 sc). Turn and repeat. I only did 3 rows but you can keep going until you reach desired thickness.
3. For the bow, chain 10. (row 1) Then turn and sc 10 across (row 2). Repeat for next 4 rows and you should have 6 rows total. End product ressembles a rectangle. 
4. To make it look more rounded you can now single crochet in each of the 10 sc, then 6 sc up one side, 10 sc then 6 more sc up the other side (basically just sc around the whole rectangle)
5. Find the middle of your rectangle and wrap with yarn to gather it into a bow. Fasten.
6. Attach one end of your band to the back of the bow using a slip stitch. Then attach the other end in the same way and voila. You have an adorable bow headband. Hopefully.

Thursday, May 2, 2013

Family time.

As you may have read in my last post, life has been crazy for us lately and we haven't had a ton of time to spend together as a family. We try and have dinner together every night, and although it takes a bit more flexibility and coordination some weeks than others, I must say we have been doing a pretty good job of sticking to it! In our old place, dinners would consist of kneeling at our coffee table while watching tv to unwind after our long days and these dinners usually didn't involve a lot of conversing. Now don't get me wrong....the hubby and I do talk to one another.....just not usually over dinner. I don't know about all of you, but I grew up with the family gathering around the table for dinner as much as possible. That being said, we were also a busy family and it wasn't always possible for all of us to be there, but if we were at home and dinner was being served we all ate together at the table. If Dad got home late from work, we ate later. If one of us had soccer or piano at 7, then we ate earlier and perhaps that night Dad would eat alone.....but for the most part, family dinners were the time to share the events of our days with each other and talk about plans the upcoming weekend etc. 

No tv. No music. No radio. Just uninterrupted family time. 

Looking back on it, I loved those times and that's what I want for Alexis. Now that she is eating real food and our new place has an actual separate dining room, I thought it was the perfect opportunity to reinstate family dinners. We put our phones away and talk about our day and laugh at the adorable things Alexis does while eating (silly uncoordinated babies are so entertaining). I picture when she's older and sharing what she did at school or how her <insert sport here> game went or..... even further down the line I expect girl drama and love problems will likely come up (if I am lucky enough that she will talk to us about those things...fingers crossed). It makes me tear up just thinking about it. She's growing up so fast. I mean.....I can't believe she's 10 months old and already got a mind of her own. I asked for a hug the other day and she shook her head no.....what?!? Denying me hugs already? Is she trying to break her poor momma's heart? Of course now she thinks it's funny and routinely wrestles her way out of my snuggling arms while shaking her head. Where did my cuddly baby go? My point is that when I was pregnant every parent I knew.....and even some strangers on the street come to think of it, took every opportunity to tell me to "enjoy every moment, because time will fly by faster than you can imagine once you have a kid". I would nod in agreement thinking I already knew what they meant, but I don't think I truly got it. Now I do.
It's not easy to get dinner ready with a baby that never stops moving (ever....even in her sleep!). Sometimes I get frustrated when hubby is later than anticipated and Alexis can no longer be distracted by books and cheerios, but then I think about how precious our time together is and how the routines we create now are the foundation for our family to grow on. If we put family first now, Alexis will learn to value family. 
Or at least I hope it's that easy. 
So we eat together. If it gets hard....we make it work. Family time is always worth fighting for. I hope Alexis grows to cherish these times together as much as I already do. 

♥ Lindsay

Monday, April 22, 2013

Family date night

I am sure you all know I love a good deal....but there is no better deal than FREE, so I have been super excited to get Alexis to as many events as possible while she's under 2 (aka free admission). So obviously I was stoked when the hubby came home with two free Canucks tickets! We had a slight hesitation before deciding to bring Alexis. I was worried about her ability to sit in our laps for that long. Now that she can crawl and stand....would she really be ok just being held for 2 plus hours? In the end we decided that now was the time, because if we had to leave early it's not like we were out any money because the tickets were free! It's the perfect opportunity to give it a try and take her to her first Canucks game. So we bought her a Canucks shirt for $10 and went in with an open mind, knowing that it was entirely possible that she may not last past the first period....but thinking it was definitely worth a try. I am so glad we went. She was such a little rock star. Clapping when they scored....cheering with the other fans and just generally loving the excitement of the game. I am not going to lie....around the third period, she did get a little bored.....but nothing an empty water bottle wouldn't fix (I swear I have no idea why we buy toys for children when random household items are what they prefer anyway). 
Now I know she'll probably never remember it, but we had so much fun watching her react to everything going on around her while cheering and clapping her little heart out. 
It was such a great family night out! Here are a few photos of her first Canucks game: 
♥ Lindsay

Friday, April 19, 2013

Longer out than in...and a few of our favourite things


If you've been wondering what we do all day.....here are a few of our favourite things lately:

Unloading and loading our bookshelf has been a big part of our daily routine. Over and over and over again. Then when Alexis tires of that.... she hands me a book pats it and looks at me longingly. So we read it. Then I put it down. She picks it back up hands it to me and signs 'more'. How can I say no?!?
And so, we read it again. And again. And again. Until she hands me another book and we read that one. She has also started to read the books on her own and I sometimes hear her 'talking' as she reads or doing the things that we do when we read together like kiss the puppies noses in her puppy book, or stick out her tongue like the cat in her cat book. I mean really.....how cute is that?!? Bottom line is....she loves her books!!


Our new place has a window with a ledge that sits at a perfect height for Alexis to stand and look out. She stands there and sings or talks about whatever her little heart desires. She points at the birds that fly by and says 'bir' (does that count as her first word?!?). Recently she has started pointing at random things and saying 'wassat'....it's so cute it melts my heart! 

We try to get out of the house everyday....either to go to the swings or walk along the seawall. I can tell she loves these outings because the girl sings the entire way as she waves to everyone she sees! I get so many comments from passersby about how 'someone is happy' or 'what a pretty little voice she has'. I wish I could get it on video but I swear she has a sixth sense because whenever i take my phone out and get it ready she stops then I put it away and she starts again. You get the picture. So I haven't gotten it yet....gotta keep trying! 

Also we have passed a fairly big milestone.....as of April 11th Alexis has officially been longer out than in. Yes that's right friends, I got bored the other day and calculated her age in weeks and discovered she is 41 weeks old.....which is as long as she was cozied up in her mama's belly! 


This revelation got me feeling a little reflective on how far we've come. Now don't get me wrong I have loved every stage and tried to be as present as I can through the sleep deprivation and hormones etc, but I have to admit that 9 months seems to be the most fun so far. Alexis is communicating more and more every day. We are teaching her sign language ( I think we are up to 8 or 9 signs that she can do and understand) but she also adds her own flair with hand gestures that may not necessarily be by the book, but they certainly get her point across.  She's such a happy baby (most of the time)....which makes me a pretty lucky mama! She brings out the silly side in me because everything I do is funny....and it's so much fun to make her laugh. She thinks it's hilarious when I put her bunny slippers on her monkey and gets that good baby belly laugh when I blow raspberries on her neck (or she returns the favour for that matter). It's the little things. Overall she's a pretty awesome baby.  I'll have to remember this next time she wakes up ready to play at 4am or when we are in the midst of the next round of teething. 

♥ Lindsay

This is the new normal

So you may have noticed I have been MIA for the past few months. What's new, you ask? Well in short; A LOT!! Our lives have been filled with painting, packing, decorating....and all that comes with moving. Add to this a nutso work schedule for the hubby, a baby to take care of and to top it all off a 5 day taste of life as a single mom (much love and respect to all you single mommas out there) while Ty was away in Mexico for a Bachelor party. Let me tell you at the end of it all I could have slept for a week....now that I think about it...a week long nap still sounds pretty good! We are now in our new house which means a new layout to get used to and  learning how to use a whole new set of appliances. A new neighbourhood which means new routines, new parks, baby groups, and of course a new starbucks.....that's a lot of 'new' for this creature of habit!
 The other gamechanger moment in our lives came on February 4th when baby girl learned to crawl.....and she hasn't stopped moving since. Not only is she crawling.....but also pulling up and cruising on anything she could get her little hands on. She is still trying to figure out what will hold her and what will buckle under her weight, so I anticipate a few bumps and bruises as she tests her limits! Now don't get me wrong, I am so proud of my sweet girl, but must admit I secretly wished she would have waited until after the move to get mobile. I would have gotten things done a lot faster if I wasn't constantly having to pull her off of teetering stacks of boxes or repack boxes that she so 'helpfully' unpacked as soon as I turned my back. It was a challenging few months and I just couldn't wait for things to get back to normal! Time just kept flying by and for awhile I fell into the trap of 'if I can just get past this, then I will be able to get back to doing the things I enjoy'.....then something else would happen to throw me off again. Like finally getting all the boxes unpacked and feeling like I could get some time to relax and having the washer not working, the dishwasher leak and having a week of dealing with repair men visiting and restoration fans and dehumidifiers going 24/7.....which in turn threw off Alexis' sleep schedule BIG time (she couldn't possibly sleep and miss watching the plumber repair our supply line to the dishwasher.....that's exciting stuff, don't ya know?!?). 
"Uggghh....there just always seems to be something that throws off my routine. It's so frustrating! I just want things back to normal" I said to Ty last night. 
His reply was something like this...."Of course there is always something. That's life. Things are constantly changing, there is no 'back to normal', you just have to deal with what comes your way and adapt. Then it will change again and that's ok, you figured it out before and you will do it again"
Sigh.....there's a reason I love this man. So rational....especially in moments when I am SO not rational! 
He helped me come to a huge realisation;

This is normal, this is life and we are living the new normal. 
So I need to adjust expectations and adapt to these changes. Rather than giving up on doing the things I love and miss...I have to find time to fit them in! So I am starting here, with a blog post that I may not be able to write start to finish in one sitting with no interruptions like I used to, but hey....that's what the save button is for right?!? Just because I can't finish a blog in one sitting doesn't mean I should avoid doing it altogether! So it may take me a week, or I may luck out and be able to finish in one naptime....who knows?! But, as all things do.... it will get done. And finding balance in life will always be challenging, but all I can do its try my best and remember at the end of the day how lucky I am to see this smiling face every day!
♥ Lindsay
(For the record; this didn't take me a week, or one naptime. It was somewhere right in the middle....and that's just fine!)


Friday, January 18, 2013

Simplify, De-clutter and get ready to move?!?!

Remember when I said to stay tuned for more info on #26 of last years list? Well it's official....the Trudels are homeowners....well condo-owners actually, this is Vancouver after all and we aren't millionaires! When I made this list I kind of put this item on it as a joke so who knew that just over a year later I would actually get to cross it off? It's crazy! When I came up with this years project, I had a pretty good idea that we would be closing on our condo and moving in February so that had a big part in shaping my monthly themes. I don't know about you, but I find that the longer you stay in one place, the more stuff you accumulate! It seems that unless you do a regular inventory of what you have and really assess whether you need/use everything you own and you end of with things you forgot you even had!! I know for a fact that this is the case for us, so I wanted to use the move as motivation to really downsize and de-clutter. Who wants to move stuff you haven't used in years, and probably will never use again right?!? So I have been busy, busy, busy going through our apartment room by room and  deciding what to sell, donate, or keep. I have done this before but I want to be particularly ruthless this time, because even though our new place is bigger I know from experience that we will start to accumulate stuff again and I don't want it to be just as cluttered as this place in a few short years! I did a bit of research to find some tips on organizing and de-cluttering every part of your house! I think a great place to start is to come up with a few words to describe my ideal space and how I want to feel in that space. From the kitchen to the living room, to our bedroom closet, the three words I want our new home to portray are timeless, warm and simple with a few touches of character to add bits of our personality and creativity. I have learned that I am a pretty traditional person and whether it's decor or fashion I am not much of a risk-taker. As much as I wish I could pull off adventurous fashion trends, at my core I am a jeans and t-shirt girl.....and that translates into my decor style as well, so why fight it?!? I think it's more important to look at my home or my wardrobe and feel great about it and not stressed out by trying to be something I am not! With that in mind I have a few tips for simplifying and de-cluttering your home and your life. A few are general....a few are room specific and some are common sense but I think it's always good to have a reminder just in case you are holding on to that set of sheets with a hole in it, or that bleach stained towel for who-knows-what reason?!? 

Now I am by no means an organizational genius but I do have a few tips I have learned so far....some from experience and some from an actual organizational genius (Peter Walsh), but all of them are things I have found useful in my January project!

  • When sorting, keep your vision in mind and with every item you are struggling with, ask yourself does this fit in my vision of the space? Do I love it? Do I need it? Do I have a place for it in my space? If the answer is no....get rid of it!
  • This rule goes for everything in your space....if it's stained, ripped, broken or missing a part and can't be repaired or repurposed (for something you actually NEED) get rid of it!! 
  • For your kitchen....this is a Peter Walsh tip. Keep a cardboard box in your kitchen for a week or two and every time you use a gadget put it in the box. At the end of the week or two anything that is left in the drawers is something you obviously don't use that often! You don't necessarily need to automatically get rid of everything left in the drawers, but just really think about each item and assess whether it's truly worth keeping. Like....do you really need 4 wine openers? Or did you know you had an embarrassing number of take-out chopsticks? (we really need to start asking our sushi place not to include them in future orders, especially since we have re-usable ones anyway)
  • Want to know how much of your wardrobe you actually wear? This is clothing specific and I have mentioned it before during my no-shopping year but it's worth mentioning again because I think it's a must-do when trying to organize your closet! First, take an inventory of your closet by item (10 pairs of jeans, 2o dresses, 35 t-shirts etc) and re hang all items in your closet with the hanger facing out. Then every time you wear a piece of clothing, put it back in the closet with the hanger now facing in....then you know exactly what you have worn and more importantly what you haven't! You can even count up the items and calculate the percentage of your wardrobe that you wear....like I did in 2011
  • And this friends is my favorite new rule (also courtesy of Peter Walsh) because it can be applied to almost anything from t-shirts to books to DVDs. I call it the ratio rule. The idea is that for every 5 things you keep, you have to get rid of 1. So if you have 30 DVDs and you keep 25, you get rid of 5. Thats doable right?!? I know I have at least 5 DVD's I will never watch again!
  • And finally....the most important rule is the maintenance rule.... because you can get rid of all the stuff you want, but if you just keep buying more then you will be back at square one with your closets and shelves stuffed to capacity. I have tried to follow this rule in the past with varying success, but from now on I am going to be more vigilant with enforcing it in our house. The idea is simple. 1 in 1 out. Buy a new pair of shoes? Donate an old pair. Buy a DVD, get rid of one. Buy a new coat....sell one of your old ones. You get the idea. Do this without fail and you will never be overrun by stuff again! 

It feels so good to get rid of stuff you don't need but for me the biggest change came in my closet! I really tried to focus on only keeping things that make me feel good and being honest with myself about what I wear as opposed to what I wish I wore more. It's so much simpler to look in your closet and choose from a selection of items that all make you feel happy and beautiful! That was my ultimate goal for this month, to simplify and de-clutter so I can have a fresh start in my fabulous new space!! I am going to try and post some before and afters, as well as specific results from this months mini-projects but since we are moving in February things might get a little crazy so forgive me if this ends up being my only post about this project! I hope you enjoyed my tips :)

♥ Lindsay

Monday, January 7, 2013

Quick,Easy and pretty DIY Coat rack

So I made this little gem in December and didn't even think to blog about it until a little birdie told me I should...thanks E :) 

I wanted a cute way to display Alexis' coats but I really wanted something that would match her existing decor. 


I know, I know....how does she have a decorating scheme if she doesn't have her own room?!? Well as it turns out the nesting instinct doesn't go away just because you don't have a space to 'nest in'....sooooo around this time last year I made a couple of art pieces to customize Alexis' corners of our tiny space like this and this. Then when she has her own room.....voila....it's instantly decorated! 

I came up with this idea of covering a piece of wood with fabric as a super easy way to make a coat rack that matches her fabric canvasses. Initially I thought I would buy a piece of wood, some hooks and some screws, then use some of the leftover fabric I have hanging around, but it actually ended up being cheaper to buy an existing wall hook kit like this one. I got it on sale at home depot for $8 and it ended up working out perfectly because it was the right size and number of hooks I needed but if you need something larger or smaller with more or fewer hooks etc and you can't find a kit that works then then buying the parts separately is definitely the way to go! So once I had the kit I was able to whip this baby up in about 15 minutes with only a few materials. Like I said...it's quick, easy and pretty! 


Here's what you need:

  • Wall hook kit (or a piece of wood in the size you need, hooks and screws, plus some drywall screws for securing rack to the wall)
  •  Material (enough to cover the piece of wood with some space to wrap and secure on the back....about an inch is enough)
  • Screwdriver
  • Staple gun or heavy duty stapler (depending on how hard the wood is....I used a regular stapler and it worked just fine!)

Remember how easy I said this was? Well there are literally 3 steps....

1. cover piece of wood like you are wrapping a present and staple on the back all around the perimeter of the wood to secure the fabric. 


2. take the hooks and place them evenly spaced across your piece of wood on the fabric covered side and use screw driver to attach them


 3. secure panel to the wall using drywall screws, hang your coats and you're done!

The beauty of this project is that the fabric possibilities are endless and if you choose not to use a kit then you are not limited by size or shape! Rounded edges would be more difficult to cover but not impossible, so you can let your creativity run wild.....make a square or a diamond or even get a simple wooden letter from your local craft store and cover that. Add a hook or even a pretty door pull (Anthropologie has some beautiful ones) and you have a fabulous custom wall hook for coats or towels. 
Now to tackle Alexis' growing shoe collection.....
♥ Lindsay

Tuesday, January 1, 2013

2013 Project


I have been reflecting on this past year and looking ahead to next year in order to decide what I should do for my 2013 project. In 2011 I set a goal to not buy anything, in 2012 I made a list of things to accomplish....so what's next for 2013? At the beginning of each year I don't tend to make New Year's resolutions, instead I set goals to strive for or things to accomplish. Two years ago I started blogging about my goals as well as my progress and challenges while striving for these goals....I have found it keeps me accountable and also keeps me on track to achieve them! So this year I thought about the things that I learned from my 2012 project...... Let it go. Embrace spontaneity. Manage expectations and be present. Be grateful and focus on the positive. All you need is love. 
How can I take these lessons into 2013? Last year was a pretty good year and among those lessons I also learned a lot about what makes me truly happy! So with a little help from the Happiness Project by Gretchen Rubin and my trusty J Project Sisters I came up with not 1, not 2, not even 10....but 12 goals for the year. Each month focusses on a a part of my life that I want to improve on or something to achieve in that month....from money to health and fitness, to the environment and friends and family..... there are so many aspects of my life that stand to benefit from this project and I am so excited to get started!

So here it is.....my project-a-month list for 2013: 
January- Simplify and declutter
February- Do something that scares you (starting an etsy store this month)
March- Focus on health (Daily Yoga and no processed foods)
April- No eating out
May- Get back into running 
June- Focus on Family (Be present) 
July- Buy/Eat Local 
August- Get outside for free family fun!
September- DIY Month (the only things I will buy are things for DIY projects)
October- Reduce carbon footprint (decrease garbage, decrease spending and decrease energy use)
November- Do something to make someone feel loved or happy at least once a day
December- Homemade gifts and 12 Family Dates of Christmas

Here's to a fabulous 2013!
♥ Lindsay